Introduction
Building a raised flower bed is a rewarding and practical way to enhance your garden’s aesthetics while providing a designated space for your favorite blooms. Whether you’re a seasoned gardener or a beginner, creating a raised flower bed can be a satisfying DIY project. In this step-by-step guide, we’ll walk you through the process of building a raised flower bed that adds beauty and functionality to your outdoor space.
**1. Choose the Location
Selecting the right location for your raised flower bed is crucial. Opt for a spot that receives adequate sunlight based on the needs of the plants you intend to grow. Ensure good drainage to prevent waterlogging, and consider proximity to a water source for convenient watering. Clear any grass, weeds, or debris from the chosen area.
**2. Determine the Size and Shape
Decide on the size and shape of your raised flower bed. Consider the available space, the types of plants you want to grow, and the overall design of your garden. Keep in mind that a raised flower bed that is easily accessible from all sides is practical for planting, maintenance, and harvesting.
**3. Gather Materials and Tools
Collect the necessary materials and tools for building your raised flower bed. You’ll need:
- Wooden boards or landscaping blocks: Choose rot-resistant and untreated lumber, cedar or redwood are popular choices. Alternatively, you can use landscaping blocks for a more permanent structure.
- Screws or nails: To secure the boards together.
- Topsoil and compost: A mix of topsoil and compost will provide a nutrient-rich growing medium for your plants.
- Level and measuring tape: For accurate and even construction.
- Shovel: To clear the area and dig the foundation.
**4. Build the Frame
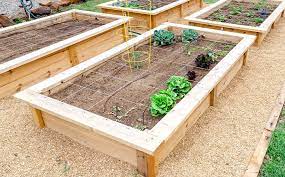
Construct the frame of your raised flower bed using the chosen materials. If using wood, cut the boards to the desired lengths for each side of the bed. Secure the corners by either screwing or nailing the boards together. If using landscaping blocks, stack them to form the sides of the raised bed.
**5. Level the Bed
Use a level to ensure the top of the raised flower bed is even. Adjust the height or level of the soil within the frame as needed. A level bed not only looks aesthetically pleasing but also ensures proper water distribution and root coverage for your plants.
**6. Add a Weed Barrier
To prevent weeds from infiltrating your raised flower bed, add a weed barrier at the bottom. Use landscape fabric or heavy-duty cardboard and lay it flat over the cleared area before placing the frame. This barrier helps suppress weeds while allowing water to drain freely.
**7. Fill with Soil Mixture
Fill the raised flower bed with a mixture of topsoil and compost. This combination provides a nutrient-rich environment for your plants to thrive. Aim for a loose and well-draining soil structure that promotes healthy root development.
**8. Plant Your Flowers
Once the raised flower bed is filled with soil, it’s time to plant your chosen flowers. Arrange them according to your design and spacing preferences. Consider the sunlight requirements and growth habits of each plant to ensure optimal conditions.
**9. Mulch Around Plants
Apply a layer of organic mulch around the base of your plants. Mulch helps retain soil moisture, suppresses weeds, and regulates soil temperature. Use materials like straw, wood chips, or shredded bark for an attractive and functional mulch layer.
**10. Water and Maintain
After planting, water your flowers thoroughly. Keep the soil consistently moist, especially during the initial weeks while the plants establish their roots. Regularly check for signs of pests, diseases, or nutrient deficiencies, and address them promptly. Maintain the raised flower bed by deadheading spent blooms and replacing soil nutrients as needed.
Conclusion
Building a raised flower bed is a fulfilling project that adds visual appeal and structure to your garden while providing an ideal environment for plant growth. By choosing the right location, materials, and plants, and following these step-by-step instructions, you can create a raised flower bed that becomes a vibrant focal point in your outdoor space. Enjoy the beauty of your blossoms and the satisfaction of your gardening efforts.
Frequently Asked Questions (FAQs)
What are the benefits of a raised flower bed?
- Raised flower beds offer improved drainage, reduced soil compaction, and better control over soil quality. They also provide easier access for planting, maintenance, and harvesting.
Can I use treated lumber for a raised flower bed?
- It’s advisable to avoid treated lumber for raised flower beds, especially if you plan to grow edible plants. Treated wood contains chemicals that may leach into the soil and affect plant health. Opt for untreated and rot-resistant lumber like cedar or redwood.
How deep should a raised flower bed be?
- A raised flower bed should typically be at least 8 to 12 inches deep to accommodate the root systems of most plants. However, for plants with deeper root requirements, consider a depth of 18 inches or more.
What types of flowers are suitable for a raised flower bed?
- A variety of flowers can thrive in a raised flower bed, including annuals like marigolds and petunias, perennials like daylilies and coneflowers, and flowering shrubs like hydrangeas and roses. Choose flowers that suit your climate and sunlight conditions.
Do raised flower beds require a lot of maintenance?
- Raised flower beds can be low-maintenance with proper planning. Regular watering, occasional weeding, and monitoring for pests or diseases are key aspects of maintenance. Adding a layer of mulch helps suppress weeds and conserve moisture, reducing the need for frequent upkeep.

